Importing Related Documents
As you implement Accolade, you may have a large number of related document files from your previous innovation management system or process that you want to include with projects and initiatives when you start using Accolade. Use a filestore and the Accolade Autoloader Service to upload the related documents efficiently to Accolade.
Note: Users with the Project Importer user role can import related documents. However, an Administrator must enable automatic uploading of files within Accolade.
Related Project Filestore Folder Structure
Accolade uploads related documents using a specific directory structure defined within a drop box location. The drop box location used to store the related documents prior to uploading can be anywhere on your network that Accolade has access to. The Autoloader Service uses the folder structure within the directory to match the related documents to the correct projects in Accolade. Administrators tell Accolade where to find the files in the Autoloader Configuration section of the Accolade Administration Console.
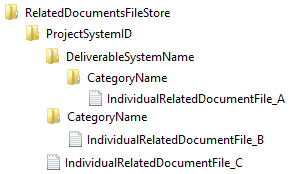
Define the folder structure as follows, where IndividualRelatedDocumentFile is one or more files to upload as related documents:

Keep the following in mind as you are creating and copying files to the filestore location:
- The filestore cannot be an FTP site.
- The highest folder in the structure must be named RelatedDocumentsFileStore so the Autoloader Service recognizes the contents of the directory as a related documents upload.
- The filestore can have multiple ProjectSystemID folders representing different projects within Accolade.
- Each ProjectSystemID folder can have multiple DeliverableSystemName folders representing different deliverables within a project.
- Individual files added to the filestore are uploaded as follows:
- Files in the ProjectSystemID are uploaded as project-level related documents with the Default category assignment.
- Files in the ProjectSystemID > DeliverableSystemName are uploaded as deliverable-level related documents and are attached to the deliverable identified in the folder name.
- Files in a category folder, either within the DeliverableSystemName folder or in the ProjectSystemID folder are uploaded and assigned that category.
- If a file already exists, a new version is created on upload. If multiple files exist with the same name in the same location, the individual files do not upload.
Important! Ensure files you copy to the filestore directory are not set to Read Only and ensure that the file names, including extensions, do not exceed 64 characters. Files with a name longer than 64 characters do not upload.
Files uploaded using the filestore contain the following details after successful upload to Accolade:
- The related document name is the individual file name as it existed in the filestore directory.
- The uploaded by name is the Service Account used for the upload service.
- The author is the Microsoft Windows author of the file.
Uploading the Related Documents Filestore to Accolade
Consider the following prior to uploading related documents:
- If there is a large number of files to upload, consider running the upload after hours.
- If there is active training or other activity happening within Accolade, consider running the upload after the activity has ended.
- Files larger than the limit set in the Maximum File upload Size system parameter do not upload.
To upload the related document in the filestore:
- Ensure files are not set as Read Only and are in the correct directory in the filestore as indicated above, and ensure that the filestore is in the drop box location defined in the Administration Console.
- From the Workspace menu, select Import > Related Documents.
- Do one of the following:
- To schedule the upload to run within the next 24 hours - In the Scheduled at fields, enter the time within the next 24 hours to upload the files in the filestore location, and click Apply. For example, to upload all files at 10:00 pm, enter 22:00. The time entered is the time in the application server's time zone, which may be different than the time zone you are in when entering the time in Accolade. After the upload runs, the time is cleared, indicating that an upload is not scheduled.
- To run the upload to run immediately - Select Now and click Apply.
After a file is processed and uploaded, it is removed from the import directory. A log file is generated and saved in the Outbox Path as defined in the Administration Console that contains the number of files successfully uploaded and information about any files that encountered an error during the upload process.